• About Us
  • Contact Us
  • Terms and Conditions
    • Privacy Policy & Disclaimer
TechArea
  • How to Do
  • Best Buy
    • Laptop
      • Best Laptops under 20000
      • Best Laptops under 30000
      • Best Laptop Under 35000
      • Best Laptops under 40000
      • Best Laptop Under 45000
      • Best Laptop Under 50000
      • Best Laptops under 60000
      • Best Laptops For Students
      • Best Gaming Laptop in India
      • Best Gaming Laptop Under 50000
    • Mobile
      • TOP 5 Mobiles Under 10000
      • Top 5 Smartphones Under 15000
      • TOP 5 Smartphones Under 20000
      • TOP 5 Smartphones Under 30000
    • Printer
    • Monitor
    • Fitness Tracker
    • Smartwatch
    • HDD & SSD
    • Projector
    • Action Camera
    • Router
  • APPS
  • Articles
  • Deals & Offers
No Result
View All Result
TechArea
No Result
View All Result

How to Easily Import Data from picture into Microsoft Excel in both Android & iOS

Reading Time: 2 mins read
Home How To Do
30
SHARES
179
VIEWS
Share on FacebookShare on TwitterPin To
Microsoft has frequently updated its office apps with new features for its mobile audiences in both Android and iOS. Recently, they introduced ‘Insert data from picture‘ feature where you can fetch any printed data table from a snapped picture with the press of a button. Earlier this was available only in Android Office App, but now it is also available in iOS.
So let’s check out how to easily import data from a picture into Microsoft Excel App.

Import Data From Picture Into Excel

1. Open the Excel App in your smartphone.

Insert data from picture excel

2. A new sheet will appear, and below it, you can find button looking like a camera grid. Tap it

Insert data from picture
Photo Credit : Microsoft

3. Now, your phone’s camera will be active. Position it over a physical spreadsheet with table data until you see it surrounded by a red border. This red border confirms the place where the data is present.

Insert data from picture
Photo Credit : Microsoft

4. In the background, Excel’s powerful AI engine will process the image and interpret the table data.

Also Read :How to remove sponsored ads & products on Amazon Page

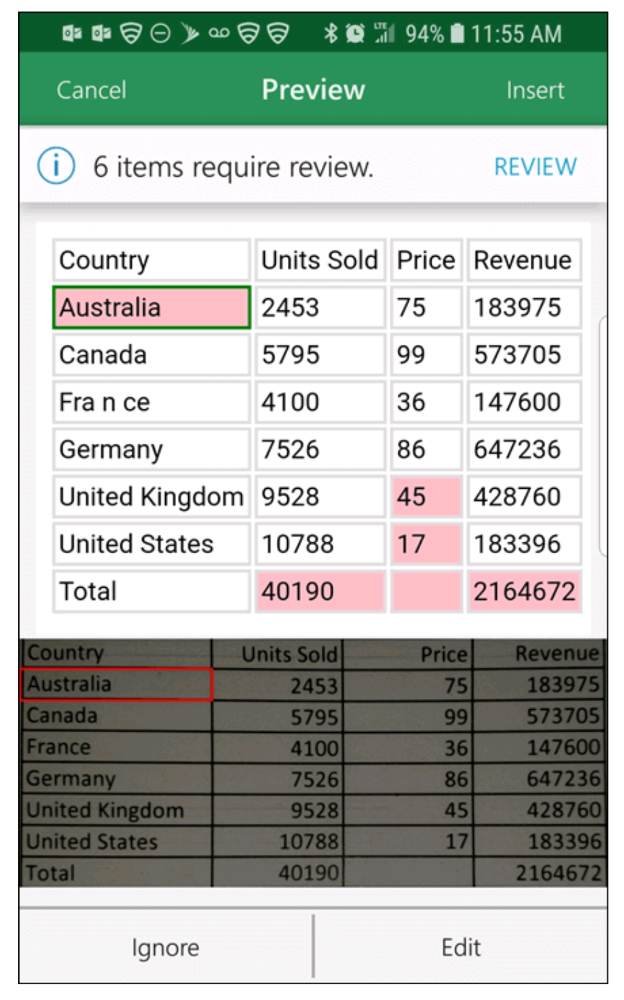
5. Once imported, it will show a preview of converted data and provide you with the option for any correction. Here, you can choose the ‘Edit’ option to revise if any, else select ‘Ignore’.

6. Next, Press ‘Insert’ and the app will finish importing the data from the picture into your excel spreadsheet in mobile.

Check the Microsoft Support forum here for more details on this feature.

This new feature from Microsoft will be of great help to professionals in the day to day tasks. Try it out and let us know whether this guide was useful in your work.

Tags: androidiOSMicorsoft ExcelNew features
Previous Post

Top 5 Best Smartphones Under 15000

Next Post

Best Free Software for PC – June 2019

Related Posts

WhatsApp to business account
How To Do

How To Change WhatsApp To Business Account – 6 Step Guide

Change your primary account on PhonePe
How To Do

How To Change Primary Account in Phonepe – 2 Minute Guide

How To Unarchive Chat on Telegram?
How To Do

How To Unarchive Chat in Telegram?

How To block ads on MX player?
How To Do

How to Stop Ads on MX Player – 3 Easy Methods

Next Post
best free software 2019

Best Free Software for PC – June 2019

Leave a Reply Cancel reply

Your email address will not be published. Required fields are marked *

Latest Posts

WhatsApp to business account

How To Change WhatsApp To Business Account – 6 Step Guide

Change your primary account on PhonePe

How To Change Primary Account in Phonepe – 2 Minute Guide

How To Unarchive Chat on Telegram?

How To Unarchive Chat in Telegram?

How To block ads on MX player?

How to Stop Ads on MX Player – 3 Easy Methods

Edite Your Name on Google Pay Featured Image

How To Change Name in Google Pay?

Newsletter Signup

Join Our 1000+ Subscribers Here


TechArea

© 2023 TechArea - Learn More & Share Even More TechArea.

Navigate Site

  • About Us
  • Terms and Conditions
  • Privacy Policy & Disclaimer
  • Contact Us

Follow Us

No Result
View All Result
  • How to Do
  • Best Buy
    • Laptop
      • Best Laptops under 20000
      • Best Laptops under 30000
      • Best Laptop Under 35000
      • Best Laptops under 40000
      • Best Laptop Under 45000
      • Best Laptop Under 50000
      • Best Laptops under 60000
      • Best Laptops For Students
      • Best Gaming Laptop in India
      • Best Gaming Laptop Under 50000
    • Mobile
      • TOP 5 Mobiles Under 10000
      • Top 5 Smartphones Under 15000
      • TOP 5 Smartphones Under 20000
      • TOP 5 Smartphones Under 30000
    • Printer
    • Monitor
    • Fitness Tracker
    • Smartwatch
    • HDD & SSD
    • Projector
    • Action Camera
    • Router
  • APPS
  • Articles
  • Deals & Offers

© 2023 TechArea - Learn More & Share Even More TechArea.